
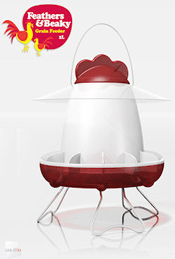
Putting your free-range feeder together
- Line up the main body of the feeder with the red clasps in the base, turning it clockwise to secure it firmly
- Assemble the flexible rain shield – see below!*
- Place the rain shield on top of the feeder, align slots around the handle and push into place
- Insert one end of the metal handle into the hole on the top outside edge of the feeder, then do the same on the other side
- Align the slots of the lid with the edges of the handle and push into place
- Unfold the legs from underneath the feeder
Add plenty of naturally nutritious Feathers & Beaky food and pop it into your chicken run!
*Assembling your flexible rain shield
If this is the FIRST time, follow these instructions…
- place the LEFT edge of the shield over the RIGHT edge
- insert the tabs into the corresponding slots
- turn the shield inside out – so that the side that was on top is now underneath – whilst this isn’t essential, it will help to ensure that the rain shield has a uniform shape, following transportation
If you’ve done it at least once before, follow these instructions (they’re slightly different)…
- place the right edge of the flexible rain shield over the left edge
- insert the tabs into the corresponding slots
Taking your feeder apart
If food has become impacted in the bottom of your feeder you may find it easier to soak it for a couple of minutes first.
- Push the metal handle downwards away from the lid
- Pull the lid off
- Remove one end of the metal handle from its hole, then the other end
- Pull the rain shield off, push the tabs out of their slots to open the shield
- Hold the main body of the feeder with one hand and the base with the other hand, push firmly towards each other and turn anti-clockwise to separate the main body from the base